How to make a custom bootlogo for your Samsung device (with Exynos)
Hi, guys! Here I'll show you how to make a custom bootlogo for your Samsung device.
Hi, guys! Here I’ll show you how to make a custom bootlogo for your Samsung device. I can assure you that it’s easy and even quick to make. As long as you follow the steps correctly, you can let your creativity flow and you’ll be able to make whatever you want.
Warning: read this before messing up
- You’ll need a phone with an unlocked bootloader (and preferably with a custom ROM or something else).
- I am not responsible for anything wrong that will happen on this process on your side, and if you point the finger at me for messing up your device, I will laugh at you.
- Also, this tutorial only works on devices with a Samsung Exynos SoC only. Trying this on a Snapdragon device will not work and may even brick your device.
- You will need to read everything carefully, as I said before, I am not responsible for bricking devices or anything wrong.
First steps
First, YOU SHOULD KNOW the exact model of your device (eg. SM-G970F). Next, you will need to download the stock ROM image of your device (or the BL part only). You can download your stock ROM image at SamFw, which I’ll be using in this tutorial.
If you’re on a stock ROM, update everything first (if you have any updates), as the bootlogo will disappear when you update the system and you’ll need to flash the bootlogo again.
Downloading the stock ROM image
On the SamFw website, you can search for any device you want with the main search bar, but here we will search our device model (as stated before, YOU SHOULD KNOW which is).
 SamFw search bar with my device (Galaxy S10e)
Once you searched your device model and reached your device page, you will see a complete list of CSC codes, which defines some specific things on your device depending on your region, like the system settings, language, APN, and system updates. For a complete list of CSC codes, you can check out this website.
 SamFw CSC list for my device (Galaxy S10e)
Here, you can search your country on the search bar above the list or select any CSC that you want, since the bootloader don’t change so much for a specific region. But I recommend you picking your specific region (which mine is ZTO, which is the brazilian one) just to ensure that everything will works flawlessly with your device.
If you click on your CSC (which is your region), you will go to a page that shows different versions of the stock ROM. We obviously will use the first one, which is the latest version, to ensure that we are doing things right.
 SamFw firmware list for my device (Galaxy S10e)
Once clicked, you will go to another page that shows the downloads for the stock ROM for your device + the region + with the firmware version you selected.
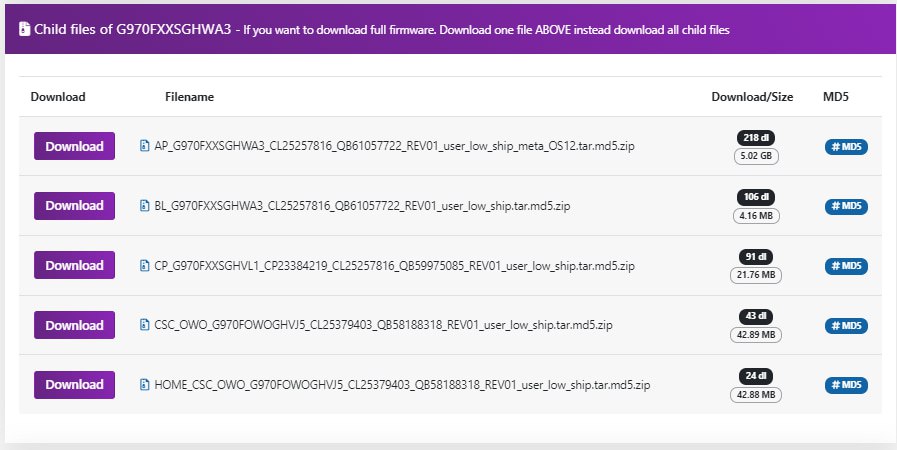
You can download the entire stock ROM or just go down a little bit and find the a download section that shows some splitted parts of the stock ROM.
If on your device page this part doesn’t appear, you will need to download and extract the entire system image. After that, you can continue the tutorial as follows.
 SamFw splitted image list for my device (Galaxy S10e)
These are the same files as you unpack the entire stock ROM ZIP, but only containing a specific part for saving download time and server bandwidth. We will use this section, as we don’t want and even use the entire stock ROM image for this tutorial.
Here, we will download the file starting with “BL” which is the device bootloader. Just click on the purple download button and you are ready to go.
Download 7-Zip ZS
For this step, we will need to download and install the latest release of 7-Zip ZS (or 7-Zip ZStandard) on GitHub, which has the support for extracting the files inside our bootloader image. You can click the link above to download and scroll a little bit to find the “Assets” button, which you will click and download the setup file according to your architecture. Just in case, download the file which finishes with “x64”, and if it doesn’t work, just try the others until they work and install.
 The “Assets” part of the release on GitHub, with the binaries and source code
Extracting and modifying our bootlogo
Now, pick the file that you downloaded in SamFw and extract it to a folder using 7-Zip ZS. Once extracted, you will see a file finishing with “.tar.md5”, so extract this file too. Once these 2 files are extracted, you can see that now we have some strange files, finishing with “.lz4”.
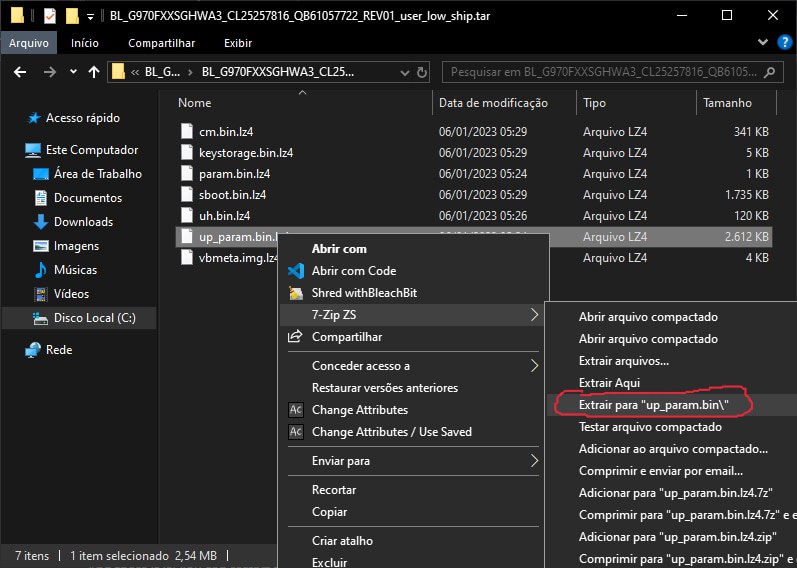
We will use 7-Zip ZS again to extract a specific file named “up_param.bin.lz4” (don’t be confused with “param.bin.lz4”) with the option “Extract to up_param.bin".
 Extracting the “up_param.bin.lz4” file
There it is the tricky part! You will go to the folder that the file extracted to, and you will find the “up_param.bin” file. But do not extract! Use the “Open compressed file” option, as it will detect which compression format the file uses and it will let us modify then.
 The contents of the “up_param.bin” file inside 7-Zip
You can pick the file named “logo.jpg” and drag it to any folder and modify it as you want, but there are a few rules to avoid bricking your device:
- You will need to mantain the same file resolution as the original one, such this is the same as the device screen resolution.
- You will need to save the file as JPG with 100% quality.
- You need to preserve the original metadata.
- And you will need to save your bootlogo as “logo.jpg”, like the original one.
Once you edited and saved the file following the rules and doing everything right, you can drag again the bootlogo JPG file that you made into the “up_param.bin” file.
Now, you need to “compile” your .tar image with the custom bootlogo that you made. This is relatively simple, as you will only need some clicks and patience.
Right-click your modified “.img” file, and use the 7-Zip “Add to archive…“ function. As you will find something similar to “Format of the compressed file”, you will select the “tar” option and press OK.
Outro
And there it is! You can flash your newly made bootlogo on the BL part of Odin (which I’m not providing the links right now, because it’s a Samsung internal product) or via Heimdall. Just after all of that, you can restart the phone and enjoy your new bootlogo!
If you want, you are always allowed to share my content with anyone. Also, you can see some bootlogos that I have already made at my telegram channel.
Cya! Hope your best!